Lately I’ve finally received my Raspberry Pi 4 (4 GB model), and I couldn’t resist the temptation to give it a try and see all the improvements that’s been reported for months.
As I’ve got one with my Pi 3 B+, I also ordered an aluminum “case” that can ease the ache of heating. One major difference is that the new cooling case is armed with two little fans, which is a rather huge boost in speed of heat dissipation.
So let’s take a look at the new Pi 4.
Overview
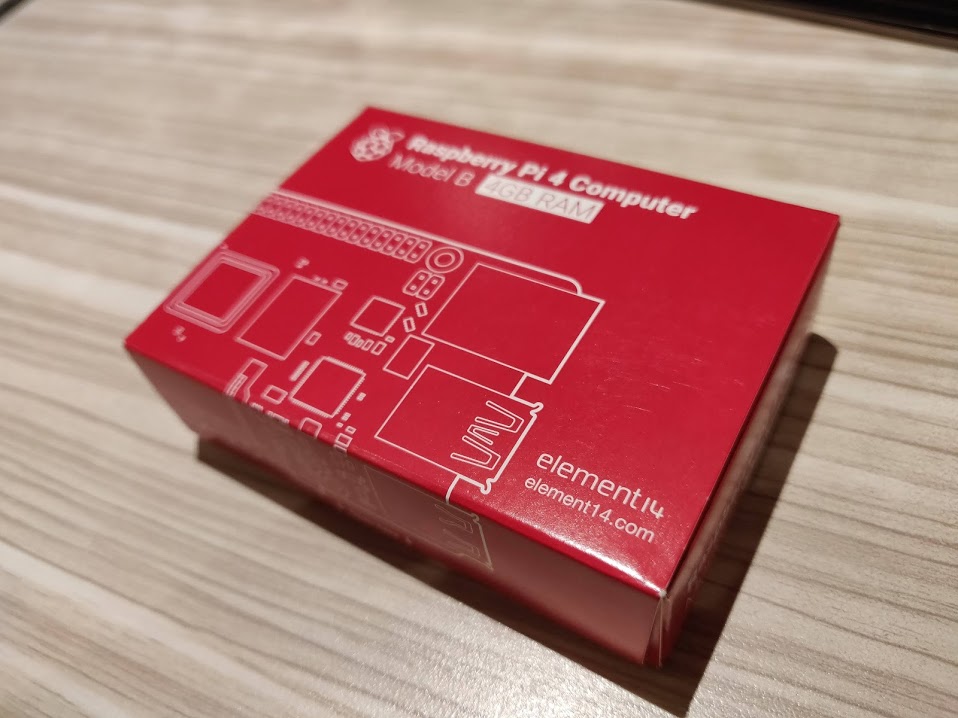
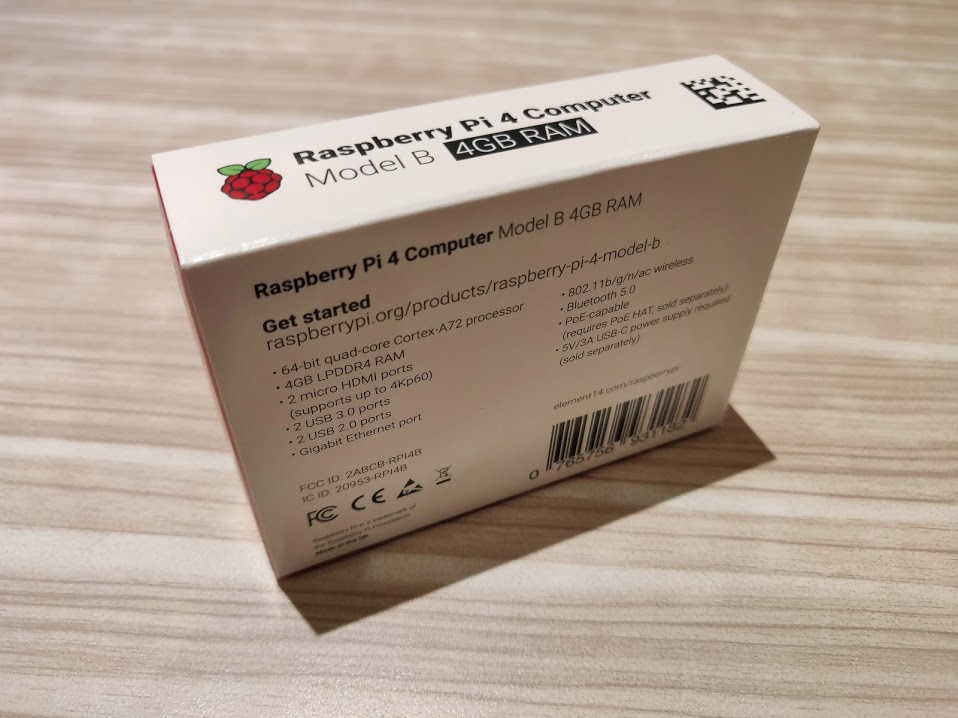
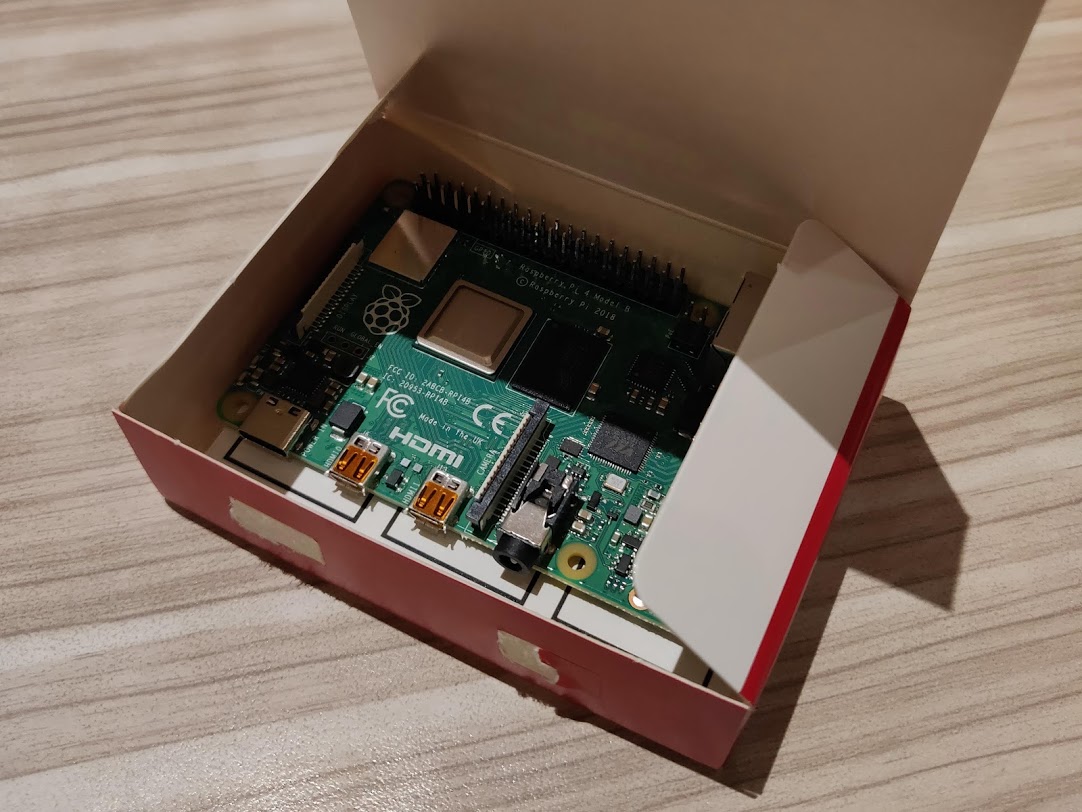
The new Pi 4 is wrapped in a box similar to that of Pi 3 B+, with a white outline of the Pi 4 in 1:1 scale on a red background. Unlike Pi 3 B, neither 3 B+ and 4 has a electrostatic-proof bag around them in the box. This isn’t anything of a problem, though.
The new Pi 4 has a similar form factor as its predecessors, with a few noticeable differences, among which the USB 3.0 ports is the first to spot, as they’re marked blue. As you inspect the USB 3.0 ports, you probably have noticed that the Ethernet port changed its position as well, which is likely due to the upgrade to a true gigabit port.
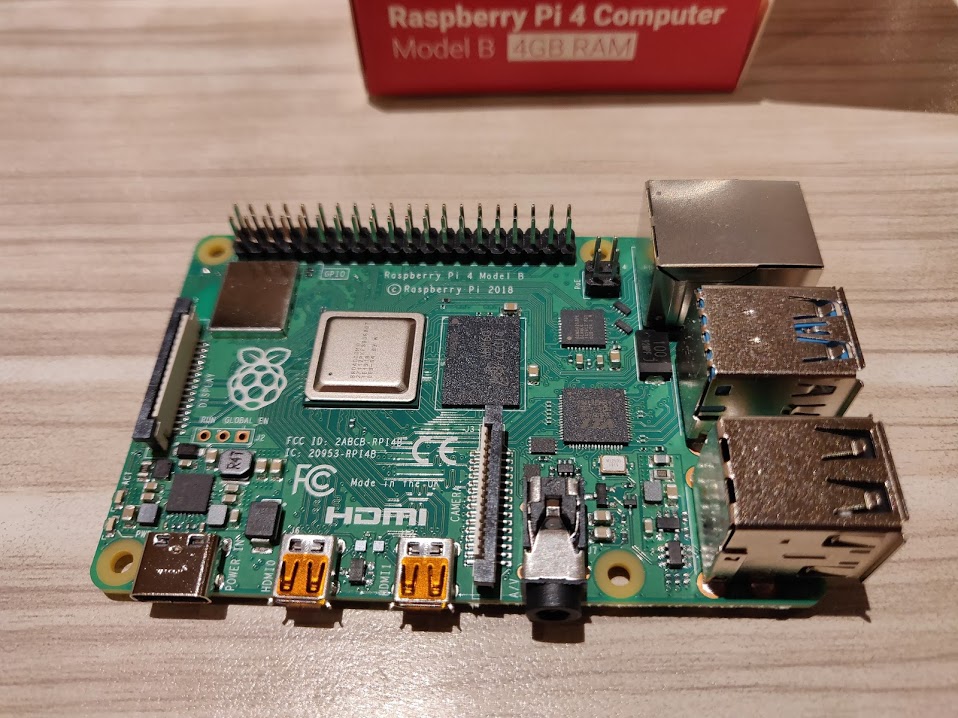
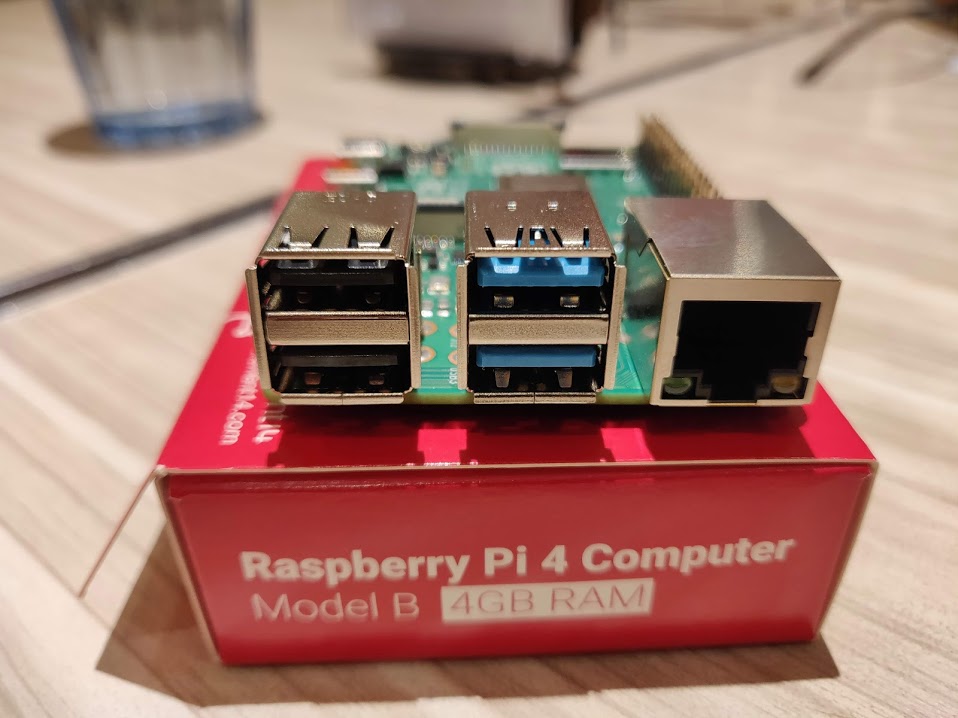
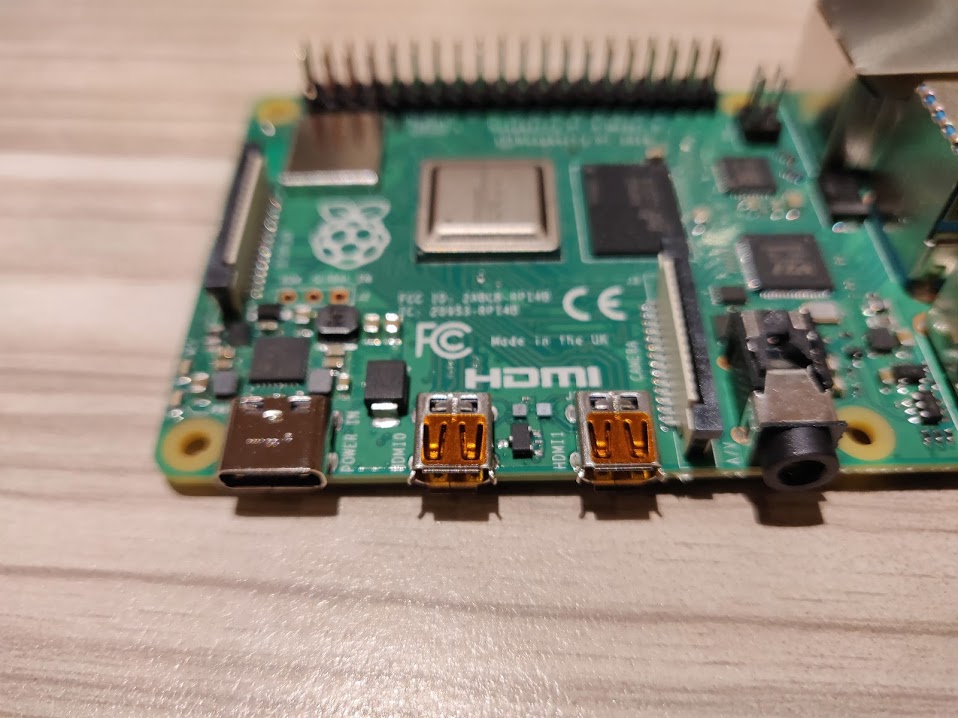
Some smaller ports, namely the power supply and the video output, have changed as well. The Pi 4 now requires a Type-C cable for power, and the requirement has raised to 5V / 3A. It’s unknown whether the Pi 4 accepts advanced charging protocols like Qualcomm Quick Charge or USB PD, but user reports goes against such assumptions. The standard-size HDMI on older models has also been replaced by micro-HDMI port, pardon, ports. Yes, there are two, and both of them supports 4K @ 60 fps output, at the same time. While I’m planning to use this Pi as a headless server, people who use it as a desktop may find it favorable.
The RAM chip has also been moved from the back of the board to the front, alongside the SoC, which has an identical look as that on Pi 3 B+, but with a completely different heart under the skins. The Wi-Fi case and antenna remain unchanged, and there’s an extra chip in front of the gigabit ethernet port.
Specs
It’s an exciting news that the new Pi 4 brings a wire range of solid and concrete upgrades, namely
- Broadcom BCM2711 SoC, quad-core Cortex-A72 CPU @ 1.5 GHz
- Comes in variations of 1 GB, 2 GB and 4 GB RAM (reviewed)
- Broadcom VideoCore VI GPU
- True Gigabit ethernet port
- Bluetooth 5.0
- Native USB 3.0 interface, with two Type-A ports
- Dual HDMI port, supporting 4K @ 60 fps simultaneously
- Faster microSD card slot
In later benchmarks, you’ll see what these upgrades really mean. Here’s a table for comparison:
| Item | Pi 3 B | Pi 3 B+ | Pi 4 |
|---|---|---|---|
| CPU | Quad-core Cortex-A53 @ 1.20 GHz |
Quad-core Cortex-A53 @ 1.40 GHz |
Quad-core Cortex-A72 @ 1.50 GHz |
| RAM | 1 GB DDR2 | 1 GB DDR2 | 1 / 2 / 4 GB DDR4 |
| GPU | VideoCore IV | VideoCore IV | VideoCore VI |
| Ethernet | 100 Mbps | 300 Mbps effective | 1 Gbps |
| Wi-Fi | 2.4 GHz | 2.4 GHz / 5 GHz | 2.4 GHz / 5 GHz |
| Bluetooth | 4.0 | 4.2 | 5.0 |
| USB | 4 * USB 2.0 | 4 * USB 2.0 | 2 * USB 2.0 + 2 * USB 3.0 |
| Price | $35 | $35 | $35 / $45 / $55 Depending on RAM |
My Pi 3 B was sold soon after I got a 3 B+, so unfortunately there isn’t one participating this review.
My setup
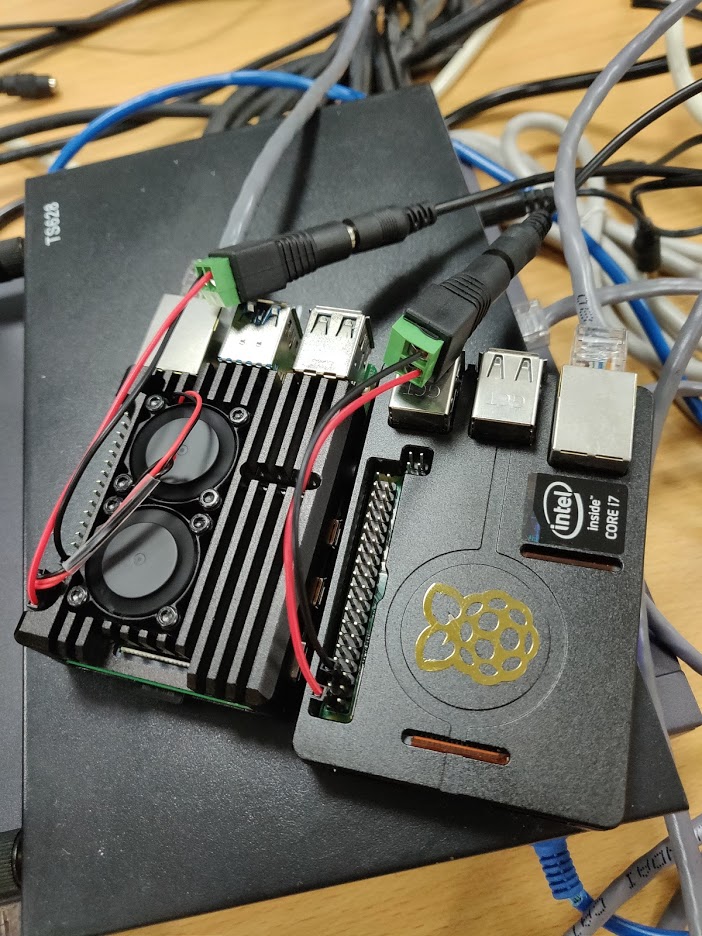
As seen above, both Pis are set up as headless servers, with only power and ethernet connected. You’re probably wondering why they look so strange, which is because my laboratory provides a lot of these power supplies rated 5V / 6A, so I just took one and use it to power both Pis through GPIO. The two Pis are rated 5V / 2.5A and 5V / 3A each (peak), which this single power supply should be able to handle without difficulty.
WARNING: Do NOT power your Raspberry Pi through GPIO unless you have stable power supply. Phone chargers aren’t power supplies and should not be used to provide power in this way.
Benchmarking
The Pis have static IP assigned and all operation is done over SSH. Operating system is latest Raspbian Buster Lite.
1. SysBench CPU test
SysBench is a benchmark suite that allows you to quickly get an impression of system performance. Here I use SysBench for CPU and Memory tests.
sysbench --test=cpu run
sysbench --test=cpu --num-threads=4 run
sysbench --test=cpu --num-threads=8 run

As shown in the chart, the Pi 4 has a decent improvement over Pi 3 B+ in terms of CPU performance, taking 19.3% less time to complete the SysBench test in all scenarios.
2. SysBench memory test
The memory test is a little bit complicated, and some unexpected results uncovers.
sysbench --test=memory --memory-block-size=1K --memory-total-size=2G --memory-oper=read run
sysbench --test=memory --memory-block-size=1K --memory-total-size=2G --memory-oper=write run
sysbench --test=memory --memory-block-size=1K --memory-total-size=2G --memory-oper=read --num-threads=4 run
sysbench --test=memory --memory-block-size=1K --memory-total-size=2G --memory-oper=write --num-threads=4 run
sysbench --test=memory --memory-block-size=1M --memory-total-size=2G --memory-oper=write --num-threads=4 run
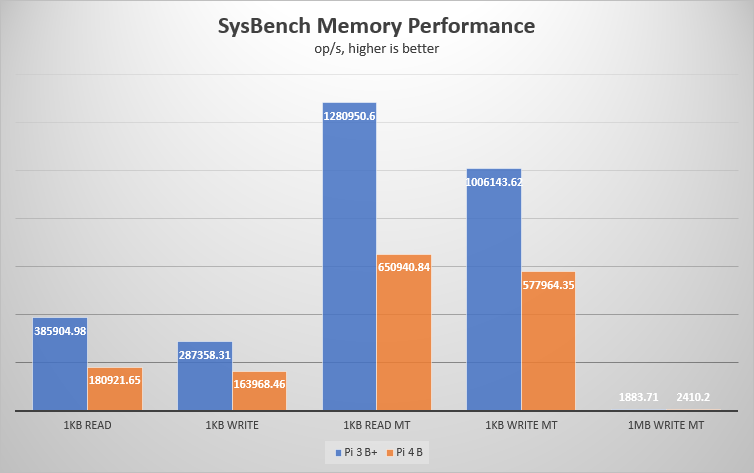
It’s very surprising to see the new DDR4 performs worse than the decades-old DDR2 memory, and even astonishing to see that multithreading makes the gap bigger. The only thing reasonable to me is that when a single block goes to 1 MiB, the Pi 4 outperforms the Pi 3 B+ slightly.
There’s one interesting thing, though, that why I didn’t include a “1 MiB Read MT” column. SysBench reported a read speed of over 200 GB/s on both boards, and the results can sometimes go up to 500 GB/s, which is ridiculous to be taken seriously, so I just dropped that result.
3. FIO microSD card speed test
This test may depend on the microSD card, so I took out my (known) fastest cards for the Pis, the Lexar 667x 128 GB microSD card, which looks like below:
I use fio for the disk (microSD card) I/O performance testing tool. Because I’m familiar with Crystal DiskMark, I tuned the command-line options of fio to match the specs of CDM.
fio --loops=5 --size=500m --filename=fiotest.tmp --stonewall --ioengine=libaio --direct=1 \
  --name=SeqRead --bs=1m --rw=read \
  --name=SeqWrite --bs=1m --rw=write \
  --name=512Kread --bs=512k --rw=randread \
  --name=512Kwrite --bs=512k --rw=randwrite \
  --name=4KQD32read --bs=4k --iodepth=32 --rw=randread \
  --name=4KQD32write --bs=4k --iodepth=32 --rw=randwrite \
  --name=4Kread --bs=4k --rw=randread \
  --name=4Kwrite --bs=4k --rw=randwrite
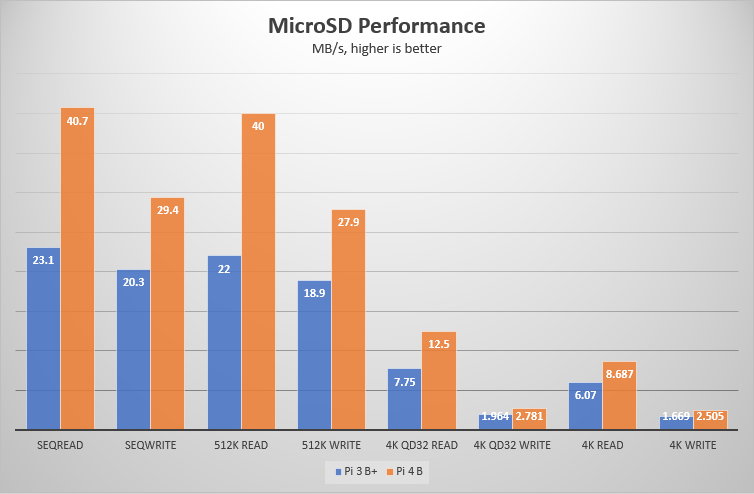
From the results we can see a huge boost on Pi 4, running 50% faster than its predecessor in many tests. This is probably the most useful upgrades on Pi 4, as the performance has always been constrained by the slow disk I/O.
4. p7zip benchmark
7-Zip has a built-in benchmarking tool, and so does its POSIX port p7zip. I use this tool to test the compression and decompression performance on the Pis.
7zr b -mmt1
7zr b
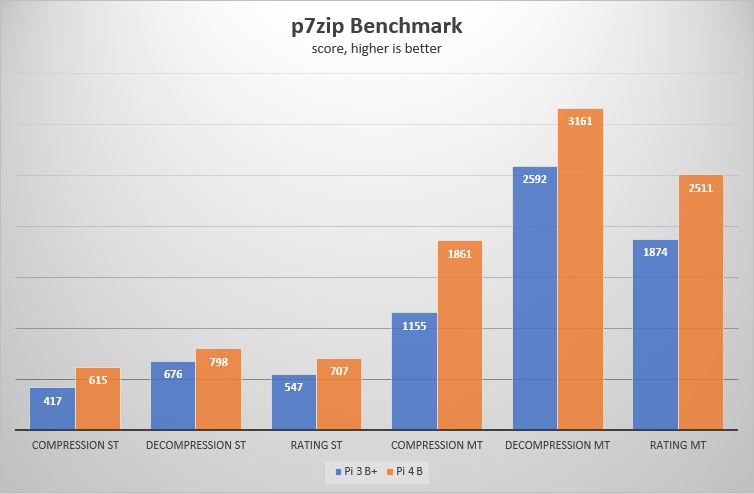
As the help article says, compression depends more on the throughput and latency of memory, which is likely the reason that the gap between the two Pis is bigger in compression test. After all, there’s a boost of 1/3 in the p7zip test.
5. OpenSSL speed test
OpenSSL is the most prevalent crypto library, and it also has built-in speed test as well. The result is the fastest speed among all block sizes, which is always 16,384 bytes in all 4 tests.
openssl speed -evp aes-256-cbc
openssl speed -evp aes-256-gcm
openssl speed -evp sha1
openssl speed -evp sha256

6. Network speed test
The Pi 4 upgraded the 300 Mbps Ethernet port to a true 1 Gbps port, which is a great benefit if you want to use it as an offline downloader or an NAS. Here I ran two tests about the network connectivity.
6.1 cURL file download test
This one is simple: Use cURL to download a file from a LAN machine and see the speed.
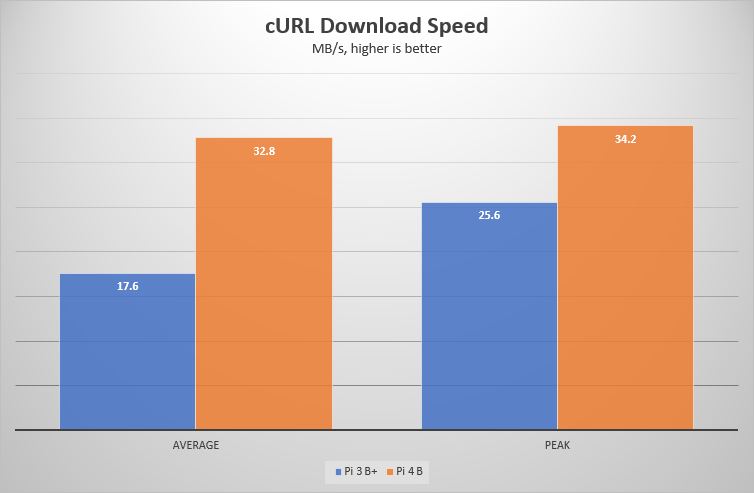
The result isn’t as expected: The Pi 4 failed to run at its true Gbps speed, while my x86 Linux box right beside it made it.
6.2 NGINX performance test
Another common use case is to serve web content with NGINX (sorry, no Apache). I installed NGINX on both Pis, set access_log off and use Siege 4.0.4 on my x86 box to benchmark the servers.
siege -c 10 -r 1000 [host]
siege -c 25 -r 400 [host]
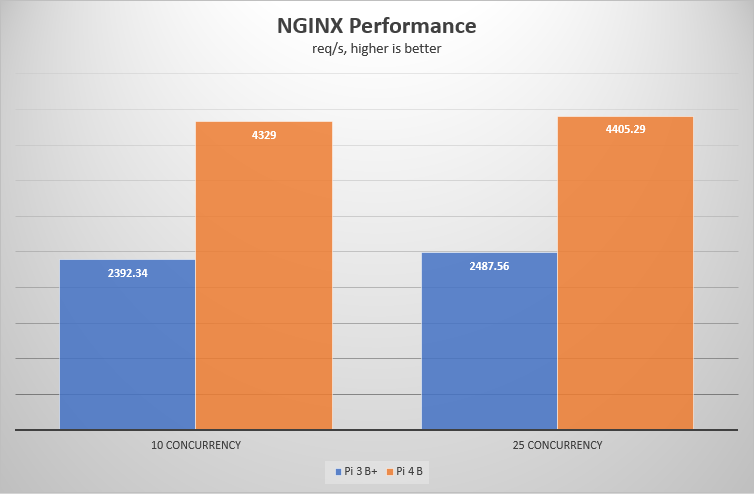
With the increase in both CPU performance and network speed, the new Pi 4 runs almost twice as efficient as the Pi 3 B+. Surely a good news for the websiters.
7. Application performance
I picked two of my favorite platforms, Python and Ruby (I’m not familiar with Node) for this test.
The Python test involves a stupid script taken from this Stack Overflow answer, and the time is taken as the result.
def test():
    """Stupid test function"""
    lst = []
    for i in range(100):
        lst.append(i)

if __name__ == '__main__':
    import timeit
    print(timeit.timeit("test()", setup="from __main__ import test"))
The Ruby test is simpler: Using Jekyll to build this site and see the time taken.
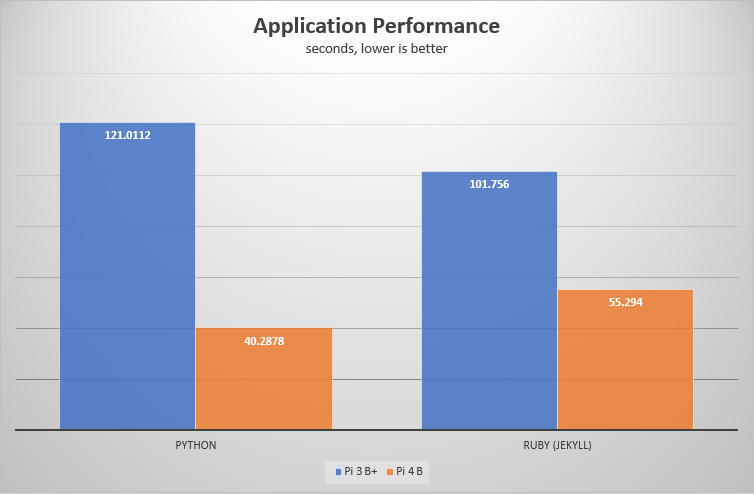
The Ruby test is more balanced than the Python test, which is pure computational performance. As a result, the performance gap is smaller in the Ruby test.
Wait, that doesn’t mean the Pi 4 would be a good platform for your bigger Python or Ruby project. The same tests run 10x faster on my x86 Linux box (i7-8850H, 32 GB DDR4, NVMe SSD), running the Python script in 5 seconds and building my Jekyll site in 4 seconds. Well, you can’t expect a beefy computer from only a board costing $55, n’est-ce pas?
8. USB I/O performance
I took out my USB 3.1 SSD (assembled with a LiteOn L9M 512 GB and an enclosure case with VL716 SATA-to-USB adapter chip). However, as soon as I plug the SSD into either Pi, it powers down immediately. This later turns out to be the issue with power supply (GPIO pins can’t pass enough power), so I came back the day after and started the Pis with power supply from the Micro USB / Type-C port. This time the Pi 3 B+ works correctly and ran through the fio test. The Pi 4, however, drops the SSD during the test due to power supply, again. I ended up powering the Pi through both Type-C and GPIO only to allow it to run the test on the SSD without power failure.
The power is a real issue this time, but putting it aside, let’s look at the results:
fio --loops=5 --size=1g --filename=fiotest.tmp --stonewall --ioengine=libaio --direct=1 --name=SeqRead --bs=1m --rw=read --name=SeqWrite --bs=1m --rw=write
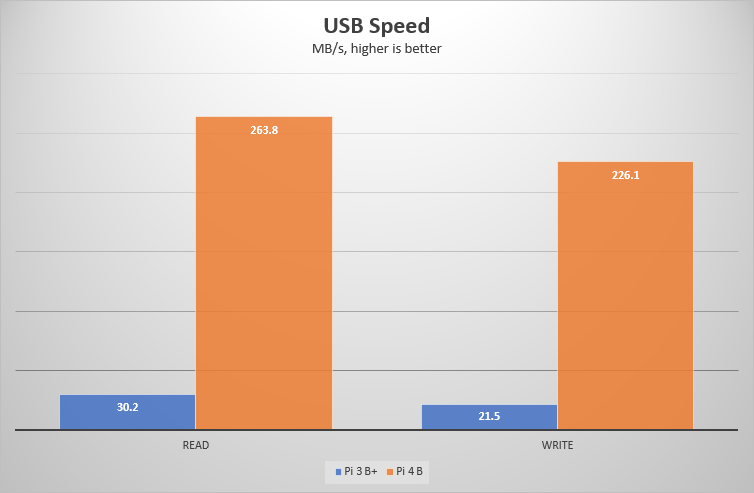
That’s impressive! The ever-upgraded USB 3.0 ports, even if not running at its top speed, is an exceptional lead over previous generations of Raspberry Pi. But before enjoying the turbo speed of the new USB ports, let’s emphasize again that you need to take special care for your USB peripherals, especially those requiring just a little bit more power than others, like hard drives and SSDs. Rest assured, if the power issue is properly taken care of, utilizing these two ultra-speed USB ports would be a great benefit to your Pi-based NAS setup or whatever storage extension.
Bottom line
Seen the marginal improvement from Raspberry Pi 3 B to 3 B+, the new Pi 4 is probably a banquet to most Pi enthusiasts. With the price remaining the same, the Pi 4 is a must-buy for everyone, even if you already have a Pi 3 B+. While there are downsides in power supply and cooling, they aren’t much of a deal if you don’t attach too many peripherals or put the Pi at constant high load.


Leave a comment