Recently we discovered that both SSDs on our storage server were giving worrisome SMART values, so we started replacing them. One of them was used only for ZFS L2ARC, so pulling it out was easy. The other runs the rootfs and we couldn’t touch it for the time being, so we inserted a backup drive thinking we can migrate the OS later on.
After returning from the datacenter, I start working on the migration. The initial steps are nothing but ordinary:
- Examine the spare drive to ensure there’s no important data on it, then wipe it (
blkdiscard -f /dev/sdb). - Create the partition table that closely resembles the current system drive’s layout: 100 MB for the EFI partition (down from 512 MB), 32 GB for rootfs, and the rest for an LVM PV.
- Format the partitions:
mkfs.vfat /dev/sdb1,mkfs.ext4 /dev/sdb2,pvcreate /dev/sdb3. - Copy the rootfs over:
mount /dev/sdb2 /t,rsync -aHAXx / /t. - Reinstall the bootloader:
mount /dev/sdb1 /t/boot/efi,arch-chroot /t,grub-install(target isx86_64-efi),update-grub. - Start migrating LVs:
vgextend pve /dev/sdb3,pvmove /dev/sda3 /dev/sdb3.
At this point, a quick thought emerges: This is not the final drive to run the system on and is only here for the transitional period. A second migration is planned when the new SSD arrives. So why not take this chance and move the rootfs onto LVM as well?
With that in mind, I hit Ctrl-C to pvmove, unbeknownst that it’s interruptible and terminating the pvmove process only pauses the operation.
For a moment, I thought I successfully canceled it and tried to re-partition the new drive.
Since the new PV is still in use by the suspended pvmove operation, the kernel would not accept any changes to /dev/sdb3.
During this process, I deleted and recreated the new rootfs (/dev/sdb2) and the new PV (/dev/sdb3) many times, and even tried manually editing LVM metadata (via vgcfgbackup pve, edit /etc/lvm/backup/pve and vgcfgrestore pve), before finally giving up and rebooting the system.
As a daily dose for a SysAdmin, the server didn’t boot up as expected. I fired up a browser to connect to the machine’s IPMI, only to find that the remote console feature for iDRAC 9 was locked behind a paywall for goodness’ sake. Thanks to God almighty Dell, things have been unnecessarily more complicated than ever before. I carefully recalled every step taken and quickly identified the problem - one important thing forgotten - GRUB was successfully reinstalled on the new EFI partition (which was somehow left intact during the whole fiddling process), pointing to the now-deleted new root partition, and so it’s now stuck with GRUB.
Fortunately, out of precaution, I had previously configured the IPMI with serial-over-LAN, so I at least still have serial access to the server with ipmitool. This saved me from a trip back to the datacenter.
ipmitool -I lanplus -H <ip> -U <user> -P <password> sol activate
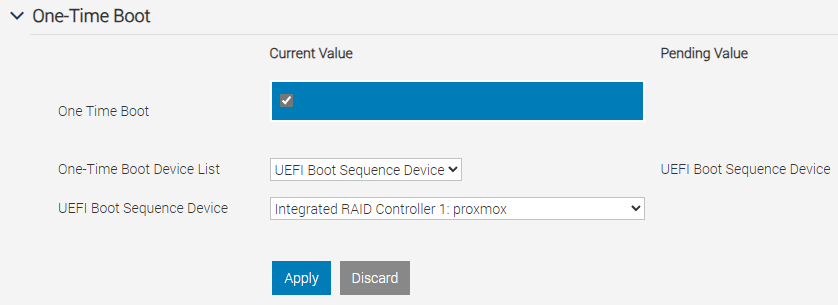
And better yet, this iDRAC 9 can change BIOS settings, most notably the boot order and one-time boot override. This definitely helped the most in the absence of that goddamn remote console.
After some trial and error, I got myself into the GRUB command line, and it didn’t look quite well:
grub rescue>
There’s pretty much just the ls command, and it doesn’t even recognize the EFI partition (FAT32 filesystem). With some more twiddling, I found this “rescue mode” capable of reading ext4, which shed some light to the situation.
grub rescue> set root=(hd0,gpt2)
grub rescue> ls /boot/grub
fonts  grub.cfg  grubenv  locale  unicode.pf2  x86_64-efi
Now things began to turn to the upswing.
grub rescue> set prefix=/boot/grub
grub rescue> insmod normal
grub rescue> normal
In a few seconds, I was delighted to discover that the system was up and running, and continued migrating the rootfs.
After everything’s done, out of every precaution, I installed grub-efi-amd64-signed, which provides a large, monolithic grubx64.efi that has all the “optional” modules built-in, so it no longer relies on the filesystem for, e.g., LVM support, in case a similar disaster happens again.
Anecdote
When trying to remove the faulty drive from the server, I at first made a wrong recall for its position, and we instead pulled out a running large-capacity HDD. Luckily it was not damaged, so we quickly inserted it back. Thanks to ZFS’s design, it automatically triggered a resilver, which completed in just a blink.
# zpool status
  pool: rpool
 state: ONLINE
  scan: resilvered 63.4M in 00:00:03 with 0 errors on Tue Mar 12 17:03:23 2024
If this were a hardware RAID, a tedious and time-consuming rebuild would have been inevitable. It’s only with ZFS that this rapid recovery is possible.
Conclusion
This incident was a good lesson for me, and some big takeaways I’d draw:
- Don’t panic under pressure.
- Use ZFS so you can sleep well at night.
- Fuck Dell, next time buy from another vendor that doesn’t lock basic features behind a paywall.
Plus, the correct way to cancel a pvmove operation is in man 8 pvmove, and it’s right at the 2nd paragraph of the Description section.


Leave a comment